
I am so excited to share this delightful Oreo Dump Cake Recipe with you! This dessert has quickly become one of my all-time favorites because it delivers the perfect combination of rich chocolate, creamy sweetness, and the nostalgic crunch of Oreos all in one easy dish. What I love most is how effortlessly you can throw it together without any complicated steps, yet it bakes into a beautifully gooey, luscious treat that’s sure to impress anyone who tries it.
Why You'll Love This Oreo Dump Cake Recipe
When I first made this Oreo Dump Cake Recipe, I was blown away by the incredible flavor explosion packed into every bite. The layering of chocolate fudge cake mix with sweetened condensed milk creates a luscious caramelized base, while the Oreos add that perfect cookies-and-cream contrast that feels both nostalgic and indulgent. The cool whip in the middle balances everything out with a light creaminess, making this dump cake a truly decadent taste sensation.
Besides how delicious it is, I absolutely adore how simple this dessert is to prepare. There’s no creaming, mixing, or multiple bowls—just layering your ingredients in a baking dish and popping it in the oven. This makes it perfect for busy weeknights, last-minute gatherings, or when you want an impressive dessert without spending hours in the kitchen. I’ve found it’s a crowd-pleaser for holidays, casual parties, or even just because I’m craving something sweet and comforting at home.
Ingredients You'll Need

The ingredients for this Oreo Dump Cake Recipe are straightforward and easy to find, each playing a unique role in building the final texture and flavor. From the crunchy Oreos to the creamy sweetened condensed milk and the moist chocolate fudge cake mix, every component is essential to this magic.
- Oreo cookies (20 - 28): I like to divide these between whole and crushed for layering and topping, adding crunchy texture throughout.
- Sweetened condensed milk (14 oz.): This is the secret to the cake’s rich caramelized sweetness and gooey texture.
- Cool whip, thawed (8 oz.): It provides a creamy middle layer that softens the intense chocolate flavors with a light touch.
- Chocolate fudge cake mix (15.25 oz.): This dry cake mix transforms during baking into a moist, chocolaty crust that brings everything together.
- Butter (½ cup cold sliced and ¼ - ½ cup melted): Using cold slices of butter ensures even melting on top, while drizzling melted butter adds richness and helps the cake mix bake evenly.
Directions
Step 1: Preheat your oven to 350°F (177°C). Lightly grease an 11x7 or 9x13 inch baking dish with a tablespoon of butter. This prevents sticking and helps achieve a golden crust on the cake’s edges.
Step 2: Spread the whole Oreo cookies evenly across the bottom of the prepared baking dish. Depending on your pan size, this will be about 18 to 22 cookies. This layer gives a hearty, crunchy base to your dump cake.
Step 3: Pour the sweetened condensed milk evenly over the Oreos. This will gently seep into the cookies during baking, creating that signature caramelized softness.
Step 4: Spread the thawed cool whip evenly on top of the condensed milk layer. This adds a creamy, light layer that balances the dense cookie and cake mix.
Step 5: Sprinkle the entire chocolate fudge cake mix evenly over the cool whip and cookies. This dry layer will bake into a moist, chocolaty crust.
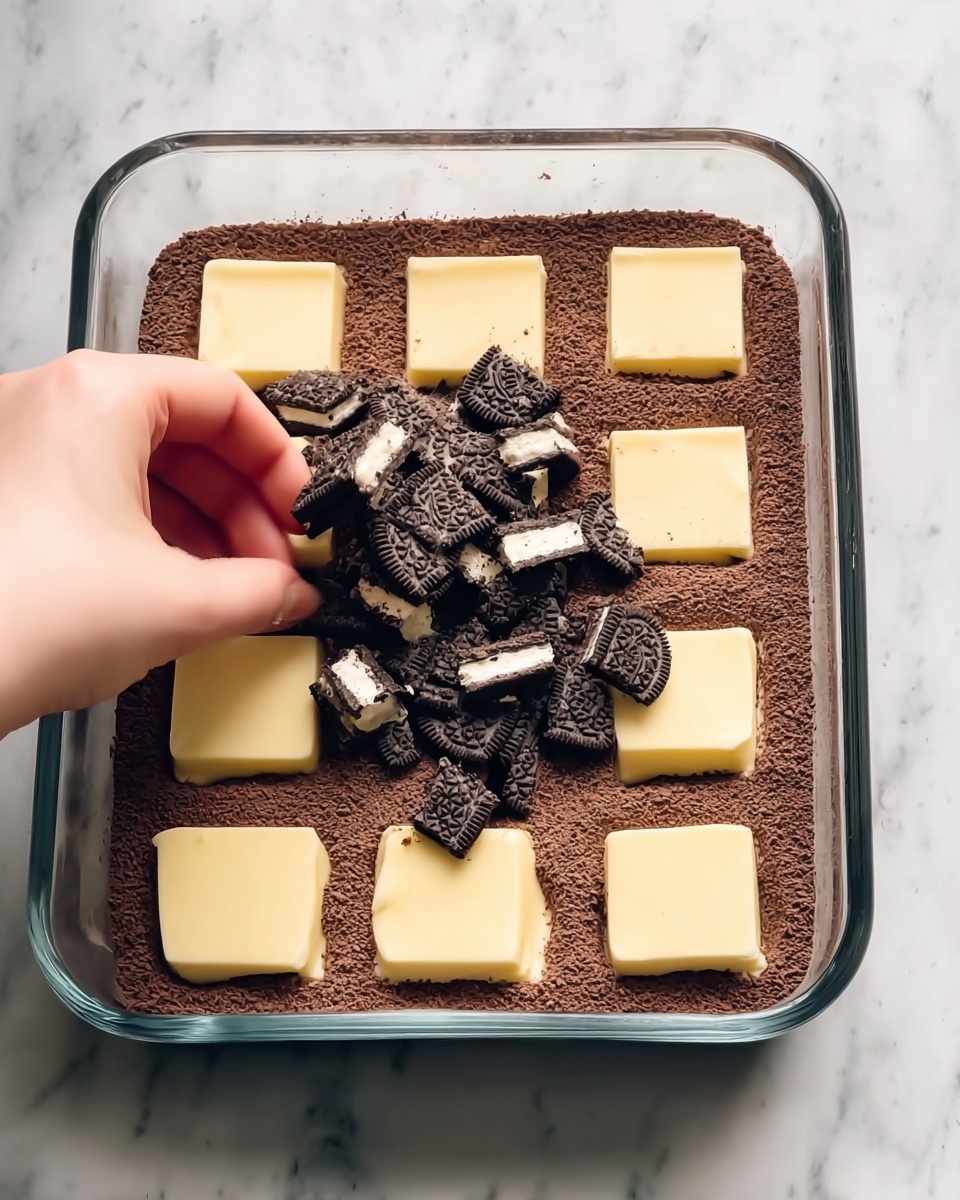
Step 6: Top the cake mix with slices of cold butter, spacing them evenly to cover as much surface as possible. Then drizzle the melted butter between the butter slices to help everything brown beautifully.
Step 7: Finish by sprinkling 4 to 6 crushed Oreo cookies over the top for extra texture and Oreo flavor.
Step 8: Bake for 35 to 40 minutes. You’re looking for the edges to bubble and lightly caramelize, especially where the sweetened condensed milk peeks through. If by 30 minutes you see dry cake mix spots, drizzle a little more melted butter and continue baking.
Step 9: Once done, let the cake cool for about 5 minutes so it sets slightly. Then scoop into bowls and, if you want to take it over the top, top with a scoop of cold vanilla ice cream. Enjoy every gooey, chocolatey bite!
Servings and Timing
This Oreo Dump Cake Recipe generously serves 8 people, making it perfect for sharing at small gatherings or family dinners. The prep time is incredibly quick, around 5 minutes, since you only layer ingredients—no fancy mixing required. Baking takes about 35 minutes, and I always recommend letting it rest for 5 minutes after baking to let the layers settle and cool slightly. That makes the total time about 45 minutes from start to finish.
How to Serve This Oreo Dump Cake Recipe
I love serving this dessert warm or at room temperature because it showcases the luscious gooey textures best. One of my favorite ways to elevate it is by topping each serving with a generous scoop of vanilla ice cream. The cold creaminess alongside the warm, chocolaty dump cake creates a perfect temperature contrast that’s just heavenly.
If you’re hosting friends or family, you can get creative by garnishing with extra crushed Oreos or even a drizzle of chocolate syrup or caramel sauce. I sometimes sprinkle a pinch of flaky sea salt to balance all the sweetness and make the flavors pop. Plus, serving individual portions in small dessert bowls or pretty ramekins makes it special and easy to share.
For drinks, I find that a rich coffee or an espresso pairs wonderfully with the chocolate and creamy flavors. If you prefer something non-caffeinated, a cold glass of milk or even a simple sparkling water with a twist of lime refreshes the palate nicely. This dessert also works beautifully for celebrations or casual weeknight meals when you want something simple but impressive.
Variations
I’ve experimented with a few twists on this Oreo Dump Cake Recipe that you might enjoy. For example, swapping the chocolate fudge cake mix for a yellow or white cake mix gives the dessert a lighter flavor profile that’s just as delicious. You can also try different cookie brands or flavors—double stuffed Oreos, mint Oreos, or even peanut butter Oreos add exciting new dimensions.
If you’re looking for dietary modifications, using a dairy-free whipped topping and vegan butter can make this recipe friendly for vegans, though it won’t be quite the same luscious texture. For gluten-free, I suggest using a gluten-free chocolate cake mix and gluten-free Oreos, which are actually available at many stores. You can also turn this into cupcake versions by layering ingredients in muffin tins, which is fun for parties and makes portion control easy.
Another method I enjoy is baking this dump cake in smaller individual ramekins, which reduces baking time and creates a fancy presentation. Just watch the cooking time closely since smaller portions bake faster. With endless tweaks, this recipe is a great base for creativity!
Storage and Reheating
Storing Leftovers
If you have leftovers (which is always a good sign!), transfer them from the baking dish to an airtight container and store them in the refrigerator. I find this helps prevent the dessert from sticking to the pan and keeps the texture just right. Stored this way, the cake will keep fresh for 3 to 4 days. Before eating, I recommend letting it return to room temperature or reheating gently.
Freezing
This Oreo Dump Cake Recipe freezes really well for up to 2 months. To freeze, portion it out into airtight freezer-safe containers or wrap the whole cake tightly in plastic wrap and aluminum foil. When you want to enjoy it, thaw in the refrigerator overnight and reheat gently. Freezing helps save leftovers for longer but can slightly change the texture, making it a bit denser, which I still find delicious.
Reheating
When reheating, the oven or toaster oven is my favorite because it crisps up the top again without making it soggy. Heat at 300°F for about 10-15 minutes or until warm throughout. Microwaving works too but can make the texture a bit softer or more gummy, so I use it only when I’m in a hurry. Adding a small pat of butter on top before reheating can revive that freshly baked feel.
FAQs
Can I use a different type of cookie instead of Oreos?
Absolutely! While Oreos are classic for this recipe, you can substitute with other sandwich cookies or even crushed chocolate chip cookies. Just be mindful that changing the cookie alters the flavor and texture — for example, mint Oreos will add a cool twist, while peanut butter sandwich cookies create a rich, nutty flavor.
What if I don’t have cool whip? Can I use something else?
If you don’t have cool whip, you can try substituting with whipped cream or mascarpone cheese for a richer layer. Keep in mind whipped cream should be stabilized (whipped properly) so it doesn’t melt into the other layers during baking. Mascarpone adds a lovely tang but changes the mouthfeel slightly.
Is it necessary to use both cold sliced butter and melted butter?
Using both forms of butter ensures even melting during baking. The cold slices help the top layer of cake mix bake with buttery pockets, while drizzled melted butter ensures the dry cake mix gets moist and bakes evenly without drying out. You can experiment but I find the combination yields the best texture and flavor.
Can I make this vegan or gluten-free?
Yes! For vegan versions, swap cool whip with dairy-free whipped topping, use vegan butter, and ensure the cake mix is vegan (or make your own replacement). For gluten-free, select gluten-free cake mix and Oreo-style cookies that are certified gluten-free. The texture will be slightly different but just as enjoyable.
How should I serve leftovers? Warm or cold?
I personally prefer leftovers served warm or at room temperature, as the flavors and textures shine best then. Reheating brings back the gooey, melty magic. However, some people enjoy it chilled—especially with ice cream on top—for a firmer, parfait-like experience. Try both to see which you like best!
Conclusion
I hope you feel just as inspired as I do to try this amazing Oreo Dump Cake Recipe. It’s one of those desserts that feels like a hug in sweet form — simple, indulgent, and guaranteed to satisfy your chocolate and cookies craving. Whether it’s a casual treat or a special occasion, I truly believe this easy, crowd-pleasing recipe will become a staple in your dessert lineup just like it did in mine. Happy baking and enjoy every decadent bite!
PrintOreo Dump Cake Recipe

Oreo Dump Cake is an effortless, delightfully rich and chocolatey cookies and cream dessert made with just 5 simple ingredients. Layers of Oreo cookies, sweetened condensed milk, cool whip, chocolate fudge cake mix, and butter come together in a baking dish for a luscious, one-dish treat. Serve warm with a scoop of cold vanilla ice cream for the ultimate indulgence.
- Prep Time: 5 minutes
- Cook Time: 35 minutes
- Total Time: 45 minutes
- Yield: 8 servings
- Category: Dessert
- Method: Baking
- Cuisine: American
Ingredients
Cookies
- 20 - 28 Oreo cookies, divided
Wet Ingredients
- 14 oz. sweetened condensed milk
- 8 oz. Cool Whip, thawed
- ¼ - ½ cup (57 - 113 g) butter, melted
Dry Ingredients
- 15.25 oz. chocolate fudge cake mix
Butter
- ½ cup (113 g) cold butter, evenly sliced
Instructions
- Prepare the Baking Dish: Preheat your oven to 350°F (177°C). Lightly grease an 11 x 7 or 9 x 13 inch baking dish with a tablespoon of butter to prevent sticking.
- Layer Oreo Cookies: Evenly spread 18 to 22 Oreo cookies at the bottom of the greased pan. The exact number depends on your pan size to create a single, full layer.
- Add Sweetened Condensed Milk: Pour the entire 14 oz. of sweetened condensed milk evenly over the Oreo cookie layer, ensuring thorough coverage.
- Spread Cool Whip: Evenly spread the thawed 8 oz. Cool Whip over the layer of sweetened condensed milk and cookies, creating a creamy middle layer.
- Top with Cake Mix: Sprinkle the 15.25 oz. chocolate fudge cake mix evenly on top of the Cool Whip layer for a rich chocolate texture.
- Add Butter: Arrange the ½ cup (113 g) cold butter slices evenly over the dry cake mix, aiming to cover as much area as possible. Then drizzle ¼ to ½ cup (57 - 113 g) melted butter in between the slices for moisture and richness.
- Finish with Crushed Oreos: Top the entire dessert with 4 to 6 crushed Oreo cookies for added texture and an extra cookies and cream punch.
- Bake the Cake: Bake in the preheated oven for 35 to 40 minutes. The sweetened condensed milk will bubble and caramelize slightly around the edges, signaling the cake is done.
- Cool and Serve: Let the cake cool for 5 minutes before scooping into bowls. Serve warm with a scoop of cold vanilla ice cream if desired for a decadent finish.
Notes
- Store leftover Oreo dump cake in an airtight container in the refrigerator for 3 to 4 days. Do not store in the original baking dish to avoid sticking caused by caramelized condensed milk.
- Check the cake at 30 minutes of baking and drizzle additional melted butter over any dry spots on the cake mix to ensure even melting and moistness. Continue baking for an additional 5 to 10 minutes.



Leave a Reply